Here we go for another Kumi tutorial!
-----edit
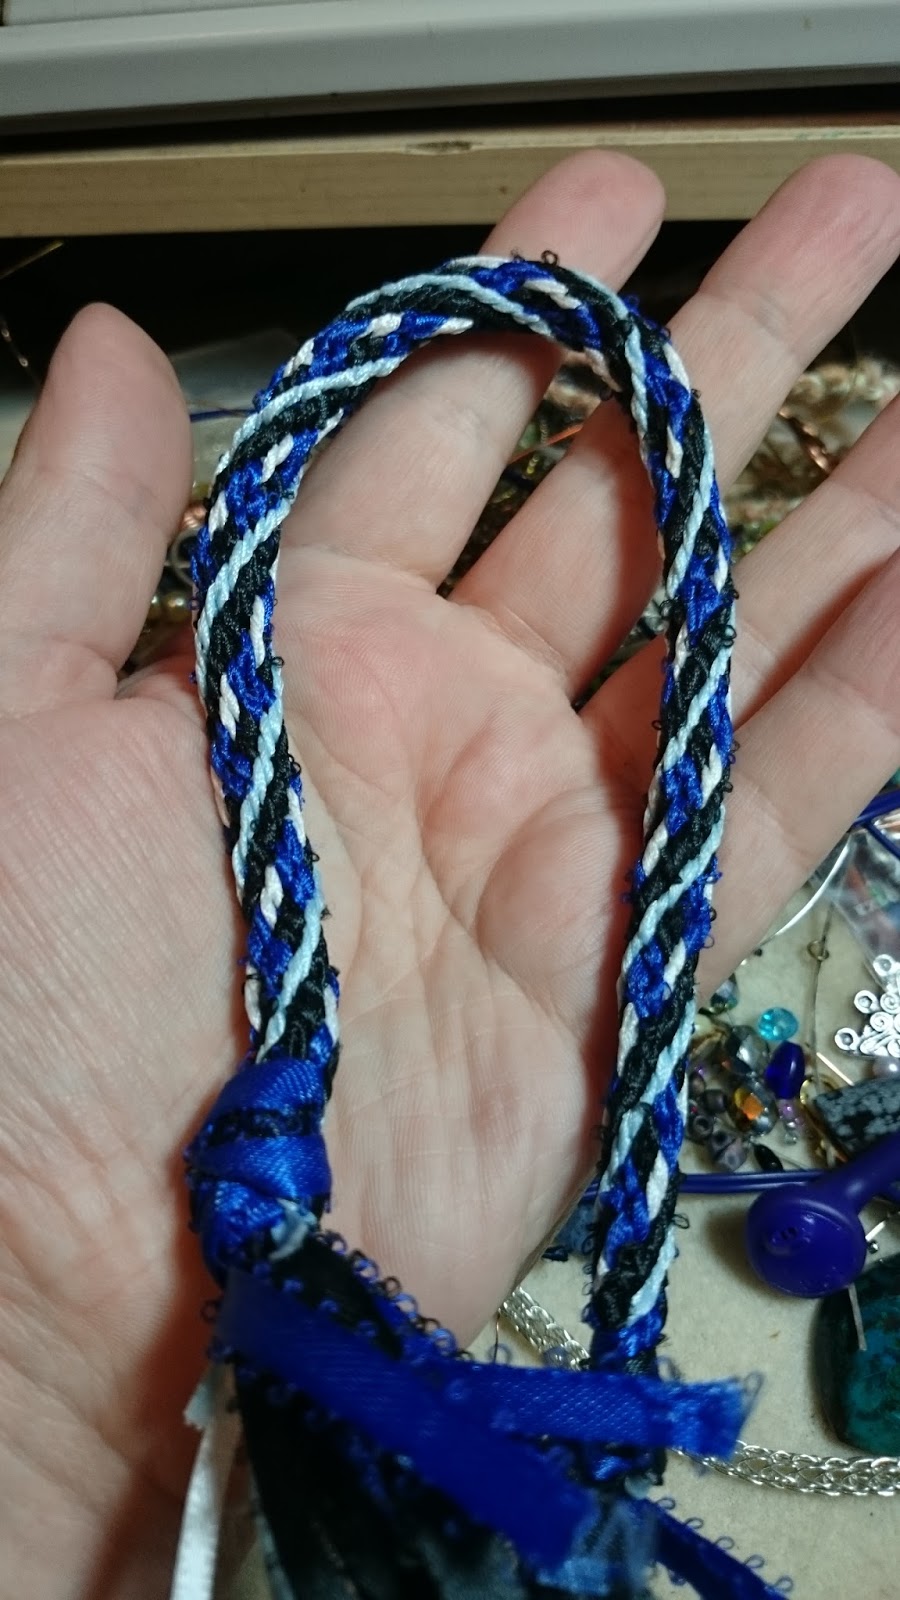
Thank you everyone for asking for the picture, it seems that the finished braid showed up right after I noticed I had new comments and responded. So here it is, along with a glimpse of my mess of a desk lol!

-----edit
I started looking through my colours of ribbon to see what I had to wrap, I was looking for blue tones, and I would have done all 4 main directions (32, 8, 16, 24) in black, but the pattern turned out pretty cool as it is. :) For those who don't know what that means yet, that would be the spots marked N, E, S, W on the disk you will see in the pictures.
Here is the setup of 16 ribbons, holding the N, or 32, at the top.

Now the first step is to take the ribbon from the right side of the 32 and bring it down to the right side of the set directly opposite on the circle, the 15.
In the second picture you see the second step, which is to bring the ribbon from the left side of the 16, up to the slot directly opposite above it, the left side of the 31.


Next you turn your disk to the right so that the ribbons on either side of 28 are at the top, or north position of your disk. You will always turn to the right with each completed right, down, left up set :)


Turn to the right.

Bring down the right of 24, and bring up the left of 8.


Turn to the right.

Bring down the left side of 20, and bring up the right side of 4. (it seems I have missed taking the picture for the first step, I am sorry about that, but if you keep following the down/up/turn steps, regardless of colour, you should be fine)

Turn to the right.

Right down.... left up... You should be getting the hang of the process by now :) Also, if you look, this time around we are resetting the colours back into the proper pairs.

Turn to the right.. always to the right.

Right down, left up...


And again to the right..

Right down, left up..


And to the right again...

At this point I don't need to take any more pictures, as if you still need direction on it, you can just go to the top again and start over. You may have noticed that your pairs move over by one tab every time you complete a "stitch" (stitch being the full right down, left up, turn motion). If when you are back to your original set being at the top (in the pictures, that's the set of two black on top, two blue on bottom) all of your warps should be 3 slots (or tabs) apart.
Thanks for reading, and happy weaving!
B
-----edit
Thank you everyone for asking for the picture, it seems that the finished braid showed up right after I noticed I had new comments and responded. So here it is, along with a glimpse of my mess of a desk lol!
-----edit
I started looking through my colours of ribbon to see what I had to wrap, I was looking for blue tones, and I would have done all 4 main directions (32, 8, 16, 24) in black, but the pattern turned out pretty cool as it is. :) For those who don't know what that means yet, that would be the spots marked N, E, S, W on the disk you will see in the pictures.
Here is the setup of 16 ribbons, holding the N, or 32, at the top.
Now the first step is to take the ribbon from the right side of the 32 and bring it down to the right side of the set directly opposite on the circle, the 15.
In the second picture you see the second step, which is to bring the ribbon from the left side of the 16, up to the slot directly opposite above it, the left side of the 31.
Next you turn your disk to the right so that the ribbons on either side of 28 are at the top, or north position of your disk. You will always turn to the right with each completed right, down, left up set :)
As before, you take the right side of 28 and bring it down to the right side of 11. Then you take the left side of 12 and bring it up to the left side of 27.
Turn to the right.
Bring down the right of 24, and bring up the left of 8.
Turn to the right.
Bring down the left side of 20, and bring up the right side of 4. (it seems I have missed taking the picture for the first step, I am sorry about that, but if you keep following the down/up/turn steps, regardless of colour, you should be fine)
Turn to the right.
Right down.... left up... You should be getting the hang of the process by now :) Also, if you look, this time around we are resetting the colours back into the proper pairs.
Turn to the right.. always to the right.
Right down, left up...
Turn to the right...
Right down.. left up..
And again to the right..
Right down, left up..
At this point I don't need to take any more pictures, as if you still need direction on it, you can just go to the top again and start over. You may have noticed that your pairs move over by one tab every time you complete a "stitch" (stitch being the full right down, left up, turn motion). If when you are back to your original set being at the top (in the pictures, that's the set of two black on top, two blue on bottom) all of your warps should be 3 slots (or tabs) apart.
Thanks for reading, and happy weaving!
B
What does the resultant cord look like?
ReplyDeleteI am looking for a picture of the cord.I will post it for you once I find it :)
DeleteNow there is a picture :)
DeleteWhere the heck is the finished product people don't want to see the ribbon on every pic. We need to see the finished picture.
ReplyDeleteOn a how to, it's customary to show every step.
DeleteThank you very much for showing every step, Yukon! NOT seeing it would make the written tutorial incredibly hard to understand. You have great patience, doing this for us beginners :-)
DeleteIs this a first lesson on how to do this? ??
ReplyDeleteI'm not entirely sure what you mean by first.. do you mean basic beginner? If you do, then the answer would be no, because the basic beginner weave is a 8 warp weave.
DeleteAnother thought.. this is a basic weave, no special turns or anything, it's just the 16 warp version. The 8 warp is much faster as it's half as many steps.
DeleteNow there is a picture :)
DeleteIs there a picture of the finish project
ReplyDeleteI haven't found one yet, or the weave itself to take a picture.. I'm going to redo the weave and possibly the tutorial to include the missed step and to include the finished braid.
DeleteNow there is a picture :)
DeleteSeems like really clear instructions to a non-Kumi(been thinking about giving this a shot for awhile), but would not attempt this without seeing the end result. Did you find the picture of the cord yet?
ReplyDeleteIt didn't make a specific pattern, it was a random colour placement meant to guide people through the making of the cord.. but I do for sure need to show the finished pic in any future ones I do.
DeleteNow there is a picture :)
DeleteDid you ever find the picture?
ReplyDeleteNot yet, sorry.
DeleteNow there is a picture :)
DeleteI also would love to see what the finished rope looks like. Thanks for the information.
ReplyDeleteDid I missed the image of what the finished product looked like.
ReplyDeleteSorry guys, you didn't miss the finished picture. I'll put it in the instructions and the comments if I ever do find the picture or the weave to take a new picture. I think the picture went the way of my old phone. I'm going to redo this tutorial as well to include the one step I missed and the end braid.
ReplyDeletePost is updated.
ReplyDeleteThanks for the update.
ReplyDelete